Step by Step Guide: How to use Portfolio Slicer
Note: This guide assumes that you have already set up Portfolio Slicer on your computer and that you are using the included External Data Management Scripts.
Video - how to use Portfolio Slicer
Steps to load YOUR data into Portfolio Slicer
- Decide what data you will load into Portfolio Slicer
- Update the
PSDataExtract\Scripts\psConfig.txtconfiguration file for your data - Run
PSDataExtract\UpdatePSData.batand review the files that were created - Update
PortfolioSlicer-Source.xlsxwith your data - Run
PSDataExtract\UpdatePSData.batagain and review the files and any reported errors - Review Portfolio Slicer reports
- Add more of your data to Portfolio Slicer
1. Decide what data you will be loading into Portfolio Slicer
Before you start using Portfolio Slicer, you need to make the following decisions.
- Decide from what date you will start tracking your investments (
MinDate) with Portfolio Slicer. We recommend that you consider adding at least 3 full years of data into Portfolio Slicer. The more data you have, the more interesting the reports become. It is also recommended that you start from the last business day of the year before the first full year with data. So if it is now mid February 2016 and, for this guide, you want a workbook with a full 3 years of data, chooseMinDateas2012-12-31. This way you will have data for full years 2013, 2014, and 2015. - Get statements from your bank or investment institution for the dates between
MinDateand now. You will need these statements to identify what holdings you had atMinDate, and you will also need transactions from that date onward. - Decide whether you want to track cash with Portfolio Slicer. For this guide, we will start using Portfolio Slicer without tracking cash, and then we will add cash tracking later.
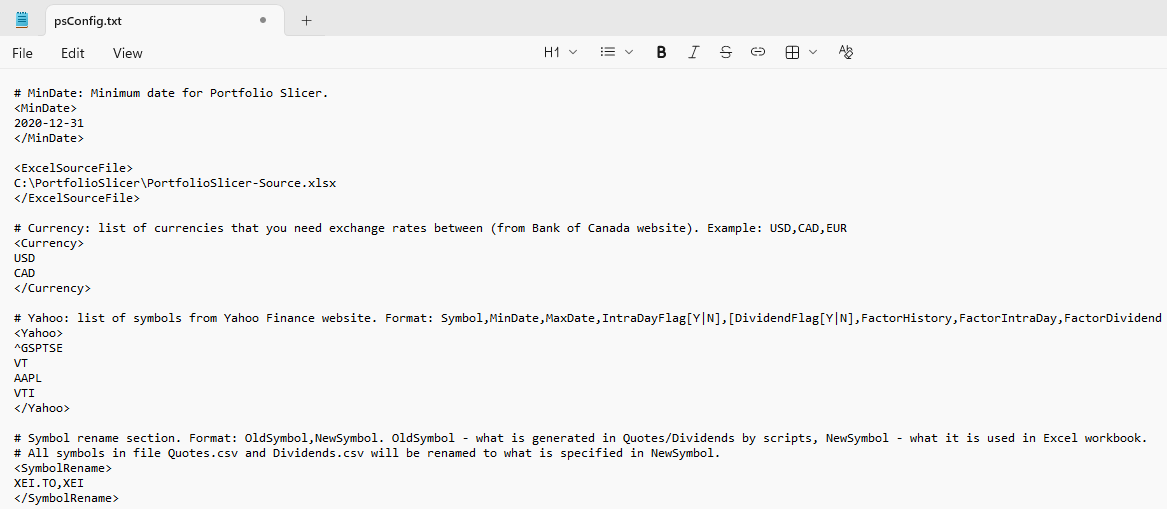
2. Update PSDataExtract\Scripts\psConfig.txt configuration file for your data
The external script configuration file psConfig.txt can be edited with any text editor, such as Notepad. The parameters that you will need to set up for the first time are listed below with sample values.
- Parameter
MinDate. The date format for this parameter isYYYY-MM-DD. - Parameter
ExcelSourceFile. You will need to specify the full path, including the file name, for thePortfolioSlicer-Source.xlsxfile. - Parameter
Currency. Here you list 3-character currency codes. If you plan to use just a single currency, you can still enter it here, but exchange rates will not be downloaded. If you have more than one currency, exchange rates for each currency pair will be downloaded by the scripts. - Parameter
Yahoo. Yahoo is the most reliable source for quotes. Here you can list the tickers or symbols that you traded and want the scripts to extract quotes for. Start with a few symbols and then add more later. - Parameter
SymbolRename. This is an optional parameter that allows you to rename symbols. For example, for the Canadian exchange Yahoo requires the symbol suffix ”.TO”. If in Excel you prefer to use symbolXEI, you can add such a rename to theSymbolRenameparameter, and in the final quote file created by the scripts this symbol will be listed asXEI.
Here are example values for the parameters listed above in the psConfig.txt file
(note: for this image, the location of these parameters in the file was adjusted)
3. Run PSDataExtract\UpdatePSData.bat and review files that were created
Now you are ready to run UpdatePSData.bat.
This batch file executes PowerShell scripts that get data from the web and then extract data into the c:\PortfolioSlicer\PSData\ folder so that it can later be consumed by Portfolio Slicer report files.
It is expected that at the end of the run you may get an error message such as: Symbol '' in Quotes.csv but not in Symbol.csv and/or a similar message about currency.
This is because you have not yet updated data in PortfolioSlicer-Source.xlsx. For now, you can safely ignore this error message.
Review the folders and files that were created by the scripts:
- Files in the folders CurrExch and CurrExchIntraDay. If you have more than 1 currency, please confirm that files with exchange rates were created and populated. If you are using just one currency, these folders will be empty.
- Files in the folders Quotes and QuotesIntraDay. Review the quotes and confirm that for each symbol you specified in the
Yahooparameter, you have quote files. - Files in the folder PSData (c:\PortfolioSlicer\PSData). These are the files that will be loaded into the Portfolio Slicer report workbook model or into Power BI.
4. Update PortfolioSlicer-Source.xlsx file with your data
The main file where you will enter your investment information is PortfolioSlicer-Source.xlsx. This Excel workbook has multiple worksheets, with one table in each worksheet. Below, we will refer to each worksheet by its main table name.
TransType - this is an internal table that lists available transaction types and how the system should treat each transaction. You should never change anything in this table.
Config - this is the configuration table. Set the
MinDatevalue to the same value you used inpsConfig.txt. For now, setTrackCashtoNo.ReportCurrency - this is the currency table. Do not touch the first
*Original*record - it should always stay there. TheEmptydata set comes with 2 additional records:CADandUSD. If you are using 2 currencies, updateCADandUSDto your currency codes. If you are using just a single currency, remove the lastUSDrow and renameCADto your currency. Note - currency values should match theCurrencyparameter list inpsConfig.txt.Account - this is your account list, which in most cases identifies an account at your investment institution. There is already one record in the table, so you can edit the
AccountandCurrencyvalues for that record. You might also edit other values, but they are used only for grouping. If you want, you can add more account records, but we recommend that you start with just 1 or 2 accounts.Allocation - this is an allocation table where you can specify your desired portfolio allocations. For initial loads you can leave this table as is, but keep in mind that any symbol specified in the
Indexcolumn should be included in theSymboltable and in theYahoosection ofpsConfig.txt. If you do not want to deal with this initially, you can simply delete the non-empty values from theIndexcolumn (that is, clear valueVTfor USA allocation in the defaultEmptyworkbook).Symbol - this is the symbol table that lists all investments you are working with. Leave the first record
* Cashas is, even when you do not track cash. Important fields in this table are:Symbol- short symbol code or ticker. This value should be in theYahooparameter section ofpsConfig.txtor in theGeneratedQuotessection.SymbolName- longer symbol name, which is helpful when it matches the name used by your investment institution.Currency- specifies the currency in which this symbol is quoted (must match a value in theReportCurrencytable).MER- Management Expense Ratio.Allocation- symbol allocation, which should match the value in theAllocationtable.
SymbolSector - this is the Symbol Sector/Sensitivity table that allows your investment value to be split by sector or sensitivity. Information about Symbol Sector is available on multiple websites, but initially you can simply assign each symbol to sector
Other. Please note that theSensitivityvalue for this table is looked up from theHelpertable on the right side of this worksheet.SymbolAllocation - this is the Symbol Allocation table, which allows a symbol allocation to be split into more than one value. Initially, you can leave this table empty.
SymbolAlias - this is the Symbol Alias table, which is used only by the
Transactionstable to look up the correctSymbolby its alias, such as name or short name. Initially, you can leave this table empty.CompareTo - this is the
Compare Totable, which is used to compare your portfolio performance with the performance of any other symbol, including a market index. You should leave records with ID 0 and 1 as they are and, for record 2, you can changeCompareTo,Symbol, andAnnlAdj%values. Please note that any symbol listed in this table should also be included in theSymboltable and in theYahooparameter section ofpsConfig.txt.srcReview - this is the Review table, which allows you to quickly review your symbol holding quantity in each account. This quick report lets you confirm that the information in the
Transactionstable is as expected. You do not need to change anything in this table, but you can refresh and review it after you enter transactions.Transactions - this is the Transactions table that lists all transactions for each account. There is already one record in this table; you should edit it and then add more records. Edit the first transaction and make it a
DepositatMinDatefor the firstAccount. If you do not track cash, specifyPriceas 0. If you do track cash, then specify the cash value atMinDate. Add a similarDeposittransaction for each account.
Then, for each symbol in each account that you hold, enter aSymbolTransferIntransaction. When editing or adding records, these are the fields you should pay attention to:Account- should match the value in theAccounttable.Date- should be betweenMinDateand the current date. The format should beYYYY-MM-DD. As you are setting up your portfolio for a specificMinDate, your first transactions will likely use a date equal toMinDate.TransType- type of the transaction. All values are listed in theTransTypetable. Your first transactions should be eitherDeposit(if you track cash) orSymbolTransferIn, to identify your holdings at the start of tracking.TransSubType- leave this empty.SymbolName- enter here the Symbol, Symbol Name (from theSymboltable), or SymbolAlias (from theSymbolAliastable). For all cash transactions (such asDepositorWithdrawal), you should specify value* Cash, that is:*then a space thenCash. You will know whether the value here is acceptable if the calculated columnSymbol(at the far right side) is filled with the looked-up correct symbol value rather than left empty.Qty- for any cash transaction (such as a deposit) you should always put value 1 here. For aSymbolTransferIntransaction, you will specify how many shares you had on that day.Price- for any cash transaction you will specify the cash amount. For aSymbolTransferIntransaction you will specify the price of one share on the currentDate(not when you bought it). ThePricefield value should be in the currency of the account.TotalAmount(account currency) = (Qty*Price+Fee) *ExchRate.Fee- transaction fee. Leave this empty.ExchRate- exchange rate used for fieldsPriceandFee. If your account currency and symbol currency are the same, then this field value will be empty. If they are different, you can specifyPriceandFeein the symbol currency and then useExchRateto convert that to account currency. Another option is to specifyPriceandFeein account currency and leaveExchRateempty.Comment- any comment about the transaction.CostBasisOverride- the cost basis (original total price paid) for this holding (all shares) in the currency of the account. Usually you would calculate it as:Qty*PricePaidWhenBought+Fee.
At this point you just want to have all your holdings (
TransType=SymbolTransferIn) atMinDate. This should be entered for each symbol in each account that you are starting to work with.
5. Run PSDataExtract\UpdatePSData.bat and review files and any reported errors
After changing data in PortfolioSlicer-Source.xlsx, you first need to run PSDataExtract\UpdatePSData.bat to extract the updated data into the c:\PortfolioSlicer\PSData folder.
This .bat script extracts data from the web and from the Excel source file. There is a shorter and faster version of this .bat file, PSDataExtract\UpdatePSDataFromExcel.bat, that extracts only changes from the Excel source file - you can run this if you know that you did not introduce new symbols.
If you see any errors reported while running these .bat files, do not continue to refresh Portfolio Slicer reports - first fix those errors.
If you have errors, please review the log files in the PSDataExtract\Scripts\Logs folder.
6. Review Portfolio Slicer reports
At this point you are ready to review Portfolio Slicer reports. Start with the Excel reports - PortfolioSlicer3.0-Reports-Light.xlsx or PorfolioSlicer3.1-Reports.xlsx.
The Light report will refresh much faster, but it has fewer available reports. Open the Excel report file and from the Data menu choose Refresh All, and then choose Refresh All again.
It will take some time for the refresh to complete - please wait 1-2 minutes until the Excel status bar at the bottom stops reporting activity (Loading model, Retrieving Data, Processing Data, etc.).
During the refresh process, the Portfolio Slicer Excel workbook Power Pivot module reads files from c:\PortfolioSlicer\PSData\, loads them into the Power Pivot model, and then updates existing reports by recalculating every cell.
Then you can review your reports and confirm that the holdings match what you expect to see.
7. Add more of your data to Portfolio Slicer
After you confirm that you can see your data with the first few transactions you entered, you are ready to add more transactions.
You can now choose to enable tracking of cash (Config table, set TrackCash to Yes). If you do so, make sure you update the first Deposit transaction with your * Cash deposit.
Then you can add Buy and Sell transactions from MinDate up to now for each account and each symbol. After that, repeat step 5 and step 6 - run the scripts and review the reports.
Then come back to this table and add Div or DivTA (Dividends or Dividends Total Amount) for those symbols. Again, refresh the data and review the reports. Then add data for more accounts and/or symbols.
Note: It takes substantial effort to enter all transactions into Portfolio Slicer. One of the fastest ways to do this is to use AI.
Ask ChatGPT (or any other AI) to parse your investment institution PDF statements and prepare transactions for Portfolio Slicer.
Copy these transactions into an empty Excel worksheet, review and adjust them, and then copy them into the Portfolio Slicer Transactions table.
After a few iterations, you should have all of your investment information in Portfolio Slicer. After the initial setup is done, you will still need to add more records to this transaction table as new transactions are done at your investment institution.